
Wyze Cam
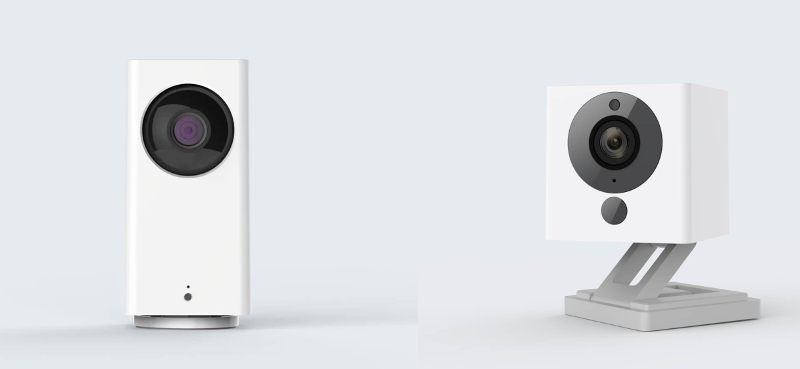
Looking for a quality camera that won't break the bank to secure your home? Then look no further as the Wyze cams may be your solution. The camera works off of a wifi connection so there is no video recorder or other hardware to purchase. Simply download the Wyze App and you are on your way to a delightful experience. It's video streams are encrypted via AES 128-bit encryption so you can feel confident that it will be safe. You have options for recording in HD 1080p, SD 720p, or 360p for your recordings and streaming. The higher the resolution the better quality picture however it will take up more bandwidth on your network. Night Vision is also a standard feature on all Wyze cams as they have a built-in infrared light which allows for taking videos at night. The Cams also work with Alexa, Google Assistant, and IFTTT. In our case, we tried the video feed with an echo show 8 but had a bit of buffering going on. The video on the app was perfect so it might have been an issue with Amazon but we were not able to determine the cause.
The App allows you to manually record a video or take a picture from the Live Stream and saves it directly onto your phone. This is a neat feature that allows you to view, send, or share through the Album in the Wyze app or your phone’s gallery to any of your contacts or from within other applications. The app also allows you to communicate via the camera's two-way audio, it allows you to hear what is going on as well as speak through it to someone on the other side. Via the app, you can also pinch your way through the video or images taking advantage of an 8x Digital Zoom to get closer to the action.
The event recording can be set on schedules, or triggered by detecting Motion and/or Sound. You can choose between all day or a scheduled start and end time with the event recording schedule. Motion is detected by comparing pixels in one frame with another, the Wyze app lets you set the sensitivity of your Wyze Cam. Motion Tagging can be enabled or disabled and will show a green box around anything considered motion. You can even set a detection zone to isolate an area that you may not want to trigger such as a ceiling fan.
A free service is included with the purchase of each Wyze cam that submits a 12-second video to the AWS cloud when the Wyze Cam detects motion or sound. These videos can be viewed for up to 14 days through the Wyze app and are automatically deleted.
Wyze Cams also offers a micro SD card slot to allow for continuous recording or event only recording. The continuous footage will continue recording until space has been exhausted at which point it will overwrite the oldest file and keep recording. Event recordings are smaller files that only record when there is motion but are not limited to 12 seconds.
If you decide to disable the camera for whatever reason, you can do it remotely via the app as it features an On / Off button.
As an added bonus, firmware can also be installed that allows RTSP support giving you the flexibility to add these cameras to your own NVR systems such as Blue Iris, Zoneminder or any off the shelf DVR / NVR solution that allows RTSP streams. You can find the details on the Wyze support page here.. We were able to test video on Zoneminder via the RTSP stream and it works better than expected to allow us to record events locally without going to the web.
If you want to store your complete video footage on the cloud, Wyze also offers that service for $1.49 /month for each Wyze Cam you’d like to enable at the moment.
The Good
- The price can't be beat at $25.00 for Wyze Cam V2 - WYZEC2 or $34.99 for Wyze Cam Pan - WYZECP1
- Loaded with features
- Great picture quality
- Small footprint on the Wyze cam V2, even the PAN version isn't that big, it's about twice as tall as the Cam V2
- RTSP support
- PAN version includes Pan Tilt functionality that works really well
- Multiple colors are available on the Wyze Cam. White, Black (Limited Edition) and Green (Limited Edition)
- Can pay a service to increase footage to longer than 12 seconds on AWS
The Bad
- No Power Over Ethernet (POE) feature
- 12-second video limit on AWS cloud (The Free Stuff)
- Only suggested for indoors (Enclosures exist to allow outdoor use. Check them out on Amazon
- RTSP support is not on the main software track so you will not get any new features. We, however, gave this a try and do not see any features missing
Get your Wyze Cam on Amazon


Posted In: Technology
Zooz ZEN20 Z-Wave Power Strip Ver 2.0 Review
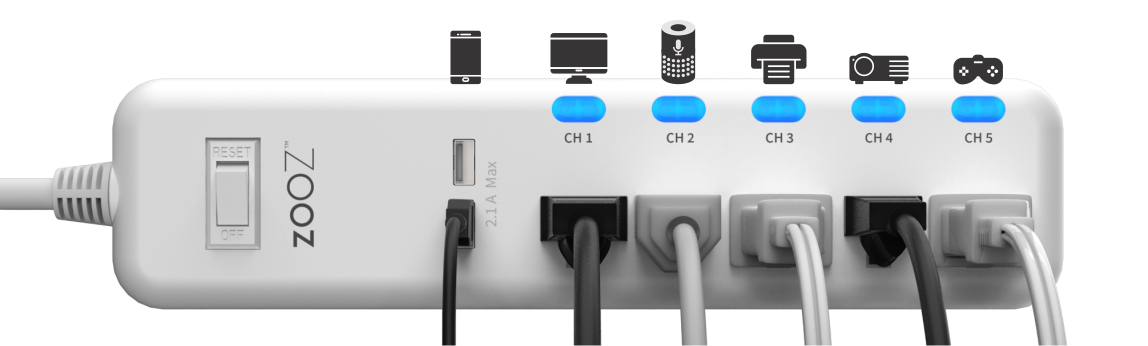
The ZEN20 Ver 2.0 Zwave Power Strip offers 5 Z-Wave controlled outlets on one strip along with two USB ports. The two USB ports offer 2.1 Amps split between both ports, the USB ports are not Z-Wave enabled but will provide status, and you do have the option of using them to set up charged or standby charging notifications. The power cord on the unit is 2 feet long similar to standard power strips. It has a high-quality build and comes packaged well in a nice fancy box that is similar to high-end cell phone packaging. The Power strip features buttons on each of the outlets that double as blue status indicators when the outlets are on. The manual control of the buttons has a low tick sound to it similar to depressing a key on a keyboard. It is important to note that it is not a surge suppressor, but it does have overload protection. The Power Strip will automatically shut off if the total power draw exceeds 1800 Watts. You can lower the limit any time you wish via your z-wave hub advanced setting configuration.
The ZEN20 works with Fibaro, HomeSeer, Hubitat, SmartThings Hub, Vera, Wink and Wink 2 but the Wink 2 has no Energy Monitoring. You should verify your specific hub works on the Zooz website prior to ordering to make sure your specific hub works. We just tested and confirmed that it also works with OpenHab when using the latest Openhab snapshot binding and that is what we used for our testing. Note that Zooz mentions it does not work with Vivint, ADT, or 2GIG hubs.
The Powerstrip allows for wall or under desk mounting and has a flat plug that allows it to fit easily behind furniture. The plug is also angled and the idea is if you had two power strips, you would be able to put them both on a standard outlet. The Unit is ETL Listed which is basically the same as the UL (Underwriters Laboratories) Listed. ETL actually uses the same standards but many manufacturers go with ETL because they are quicker at approving devices so that they can get to production quicker.
The pairing process was relatively simple, you simply press the button on the channel 1 outlet 3 times and the device goes into pairing mode. Quickly put your hub in inclusion mode and within a few seconds, your device is added to your hub. Upon pairing, we found a switch for each channel added to our hub, the main switch that controls all the channels, two switches to indicate status on the USB ports, and a meter reset switch to match each of the outlet switches is also provided. For telemetry, we see the Watts and kWh readings on each outlet. We were somewhat bummed out that you only get kWh and wattage but No amperage or voltage like the Zooz ZEN25 double plug that we reviewed previously had. Even without load, the device runs warm to the touch however it is nothing to be scared about. It has a built-in signal repeater to strengthen your Z-Wave network and features the latest 500 series chip for faster, more reliable connectivity with the new S2 security protocol.
The device by default will remember status upon power failure and return to the last status when the power comes back on. Advanced features allow you to modify this setting to default the unit to turn on all outlets after a power failure, or Off if you would like. The advanced features also allow for disabling of the buttons so that devices aren't enabled or disabled by mistake, at this point, it will require control via your hub.
It is important to know that the power strip has a limit of 15 amps max. This is the size of a typical house electrical breaker for outlets in the US so we feel this is adequate and not something to worry about. Connecting heavy duty equipment to this Power Strip will damage it and may cause the connected appliance to malfunction so if you are unsure contact Zooz, they have great support for their devices and answer questions within 24 hours from our experience. Zooz recommends that the device not be used by washers, dryers, refrigerators, electric heaters, fans, pumps, chargers, or routers. We easily understood the devices with heating elements as they draw lots of power and similarly electric motors but we were somewhat confused about routers. After contacting Zooz, they stated that just like cell phone chargers, these devices are impulse loads that don't draw power evenly. They discourage chargers because they may not be pulling enough to power the electronics in the devices; depending on the device, it may be pulling too much at times which will cause the unit to overload. This is the main reason that they included the USB port option on both the ZEN25 and ZEN20.
Our experience with the power strip has been a positive one. The device works as described and does so without incident. As noted earlier inclusion was a sinch. Operating the device is no different from any other z-wave device. We believe this is a great device for things like Christmas trees where you will need lots of outlets and individual control. It will also work well for home theater equipment where lots of outlets are required. The build on the ZEN20 is great, it feels very sturdy and has a shiny white finish. We would have liked the outlets to be offset a little more from each other to allow for larger plugs.
To further customize your power strip, Zooz offers the following Advanced features
Power Recovery after a power failure, Turn On, Turn Off, Remember ( Default) Power Wattage Reporting Threshold. (By default its set to 5 so it will report anything above 5 Watts) Power Wattage Report Frequency (By default the strip will report status every 30 seconds) Energy kWh report frequency (By default the strip will report status every 300 seconds or 5 minutes) Overload Protection for wattage across all 5 outlets ( Device will trip after sensing 1800 watts by default) Auto Turn-Off TImer (Disabled by default for each outlet individually) Auto Turn-On TImer (Disabled by default for each outlet individually) Manual Control (Enabled By default) LED Indicator Mode (default) on when an outlet is on, on when an outlet is off, off all the time
The device currently retails for $98.95 but seems to be much less than that most of the time. Currently, The Smartest House has it on sale for $66.95 which is a fair price considering a single socket adapter could cost you close to that much.
The Manual can be found here Zooz Z-Wave Plus Power Strip ZEN20 VER. 2.0 Manual (PDF)
Specifications
Z-Wave Signal Frequency: 908.42 MHz Power: 110V Maximum Load: 15Amps TOTAL between 5 outlets USB Charging Port Power: 5V up to 2.1 A Cord: 2.5' Range: Up to 100 feet (30m) line of sight Installation and Use: Indoor Only Operating Temperature: 32-104° F (0-40° C) Dimensions: 11" x 2.5" x 1" Weight: 13oz
Don't Use with
Washers Dryers Refrigerators Electric heaters Fans Pumps Chargers (impulse loads with an uneven power draw that may damage the device over time) Routers
Use With
Floor Lamps TV’s and video equipment Computers Game Consoles Alarm Clocks Printers Speakers Audio Players
The Good
Price Point Status on USB ports Angled plug Footprint not larger than a standard power strip Buttons on each outlet for manual control with status lights Use of the latest Z-Wave chip and the new S2 security protocol
The Bad
Bulky plugs can take up space that overlaps with other outlets. limited capability on impulse loads devices. Hard for a user to determine if what they are plugging in is an impulse load. Warm to touch even with no load. No control of USB Ports No amperage or Voltage reporting
What we would like to see in future
Surge suppression to protect expensive equipment from a power surge.
Get your very own Zooz ZEN20 at The Smartest House. or on Amazon.
For Openhab, you can find the latest snapshot binding here
https://ci.openhab.org/job/openHAB2-Bundles/org.openhab.binding%24org.openhab.binding.zwave/ws/target/org.openhab.binding.zwave-2.5.0-SNAPSHOT.jar. Note that you should be running Milestone Builds or the latest OH2 Snapshot to get this device working.
The ZEN20 works with Fibaro, HomeSeer, Hubitat, SmartThings Hub, Vera, Wink and Wink 2 but the Wink 2 has no Energy Monitoring. You should verify your specific hub works on the Zooz website prior to ordering to make sure your specific hub works. We just tested and confirmed that it also works with OpenHab when using the latest Openhab snapshot binding and that is what we used for our testing. Note that Zooz mentions it does not work with Vivint, ADT, or 2GIG hubs.
The Powerstrip allows for wall or under desk mounting and has a flat plug that allows it to fit easily behind furniture. The plug is also angled and the idea is if you had two power strips, you would be able to put them both on a standard outlet. The Unit is ETL Listed which is basically the same as the UL (Underwriters Laboratories) Listed. ETL actually uses the same standards but many manufacturers go with ETL because they are quicker at approving devices so that they can get to production quicker.
The pairing process was relatively simple, you simply press the button on the channel 1 outlet 3 times and the device goes into pairing mode. Quickly put your hub in inclusion mode and within a few seconds, your device is added to your hub. Upon pairing, we found a switch for each channel added to our hub, the main switch that controls all the channels, two switches to indicate status on the USB ports, and a meter reset switch to match each of the outlet switches is also provided. For telemetry, we see the Watts and kWh readings on each outlet. We were somewhat bummed out that you only get kWh and wattage but No amperage or voltage like the Zooz ZEN25 double plug that we reviewed previously had. Even without load, the device runs warm to the touch however it is nothing to be scared about. It has a built-in signal repeater to strengthen your Z-Wave network and features the latest 500 series chip for faster, more reliable connectivity with the new S2 security protocol.
The device by default will remember status upon power failure and return to the last status when the power comes back on. Advanced features allow you to modify this setting to default the unit to turn on all outlets after a power failure, or Off if you would like. The advanced features also allow for disabling of the buttons so that devices aren't enabled or disabled by mistake, at this point, it will require control via your hub.
It is important to know that the power strip has a limit of 15 amps max. This is the size of a typical house electrical breaker for outlets in the US so we feel this is adequate and not something to worry about. Connecting heavy duty equipment to this Power Strip will damage it and may cause the connected appliance to malfunction so if you are unsure contact Zooz, they have great support for their devices and answer questions within 24 hours from our experience. Zooz recommends that the device not be used by washers, dryers, refrigerators, electric heaters, fans, pumps, chargers, or routers. We easily understood the devices with heating elements as they draw lots of power and similarly electric motors but we were somewhat confused about routers. After contacting Zooz, they stated that just like cell phone chargers, these devices are impulse loads that don't draw power evenly. They discourage chargers because they may not be pulling enough to power the electronics in the devices; depending on the device, it may be pulling too much at times which will cause the unit to overload. This is the main reason that they included the USB port option on both the ZEN25 and ZEN20.
Our experience with the power strip has been a positive one. The device works as described and does so without incident. As noted earlier inclusion was a sinch. Operating the device is no different from any other z-wave device. We believe this is a great device for things like Christmas trees where you will need lots of outlets and individual control. It will also work well for home theater equipment where lots of outlets are required. The build on the ZEN20 is great, it feels very sturdy and has a shiny white finish. We would have liked the outlets to be offset a little more from each other to allow for larger plugs.
To further customize your power strip, Zooz offers the following Advanced features
The device currently retails for $98.95 but seems to be much less than that most of the time. Currently, The Smartest House has it on sale for $66.95 which is a fair price considering a single socket adapter could cost you close to that much.
The Manual can be found here Zooz Z-Wave Plus Power Strip ZEN20 VER. 2.0 Manual (PDF)
Specifications
Don't Use with
Use With
The Good
The Bad
What we would like to see in future
Get your very own Zooz ZEN20 at The Smartest House. or on Amazon.
For Openhab, you can find the latest snapshot binding here
https://ci.openhab.org/job/openHAB2-Bundles/org.openhab.binding%24org.openhab.binding.zwave/ws/target/org.openhab.binding.zwave-2.5.0-SNAPSHOT.jar. Note that you should be running Milestone Builds or the latest OH2 Snapshot to get this device working.

Posted In: YouTube Video Review
Zooz ZEN25 Z-Wave Double Appliance Plug Review
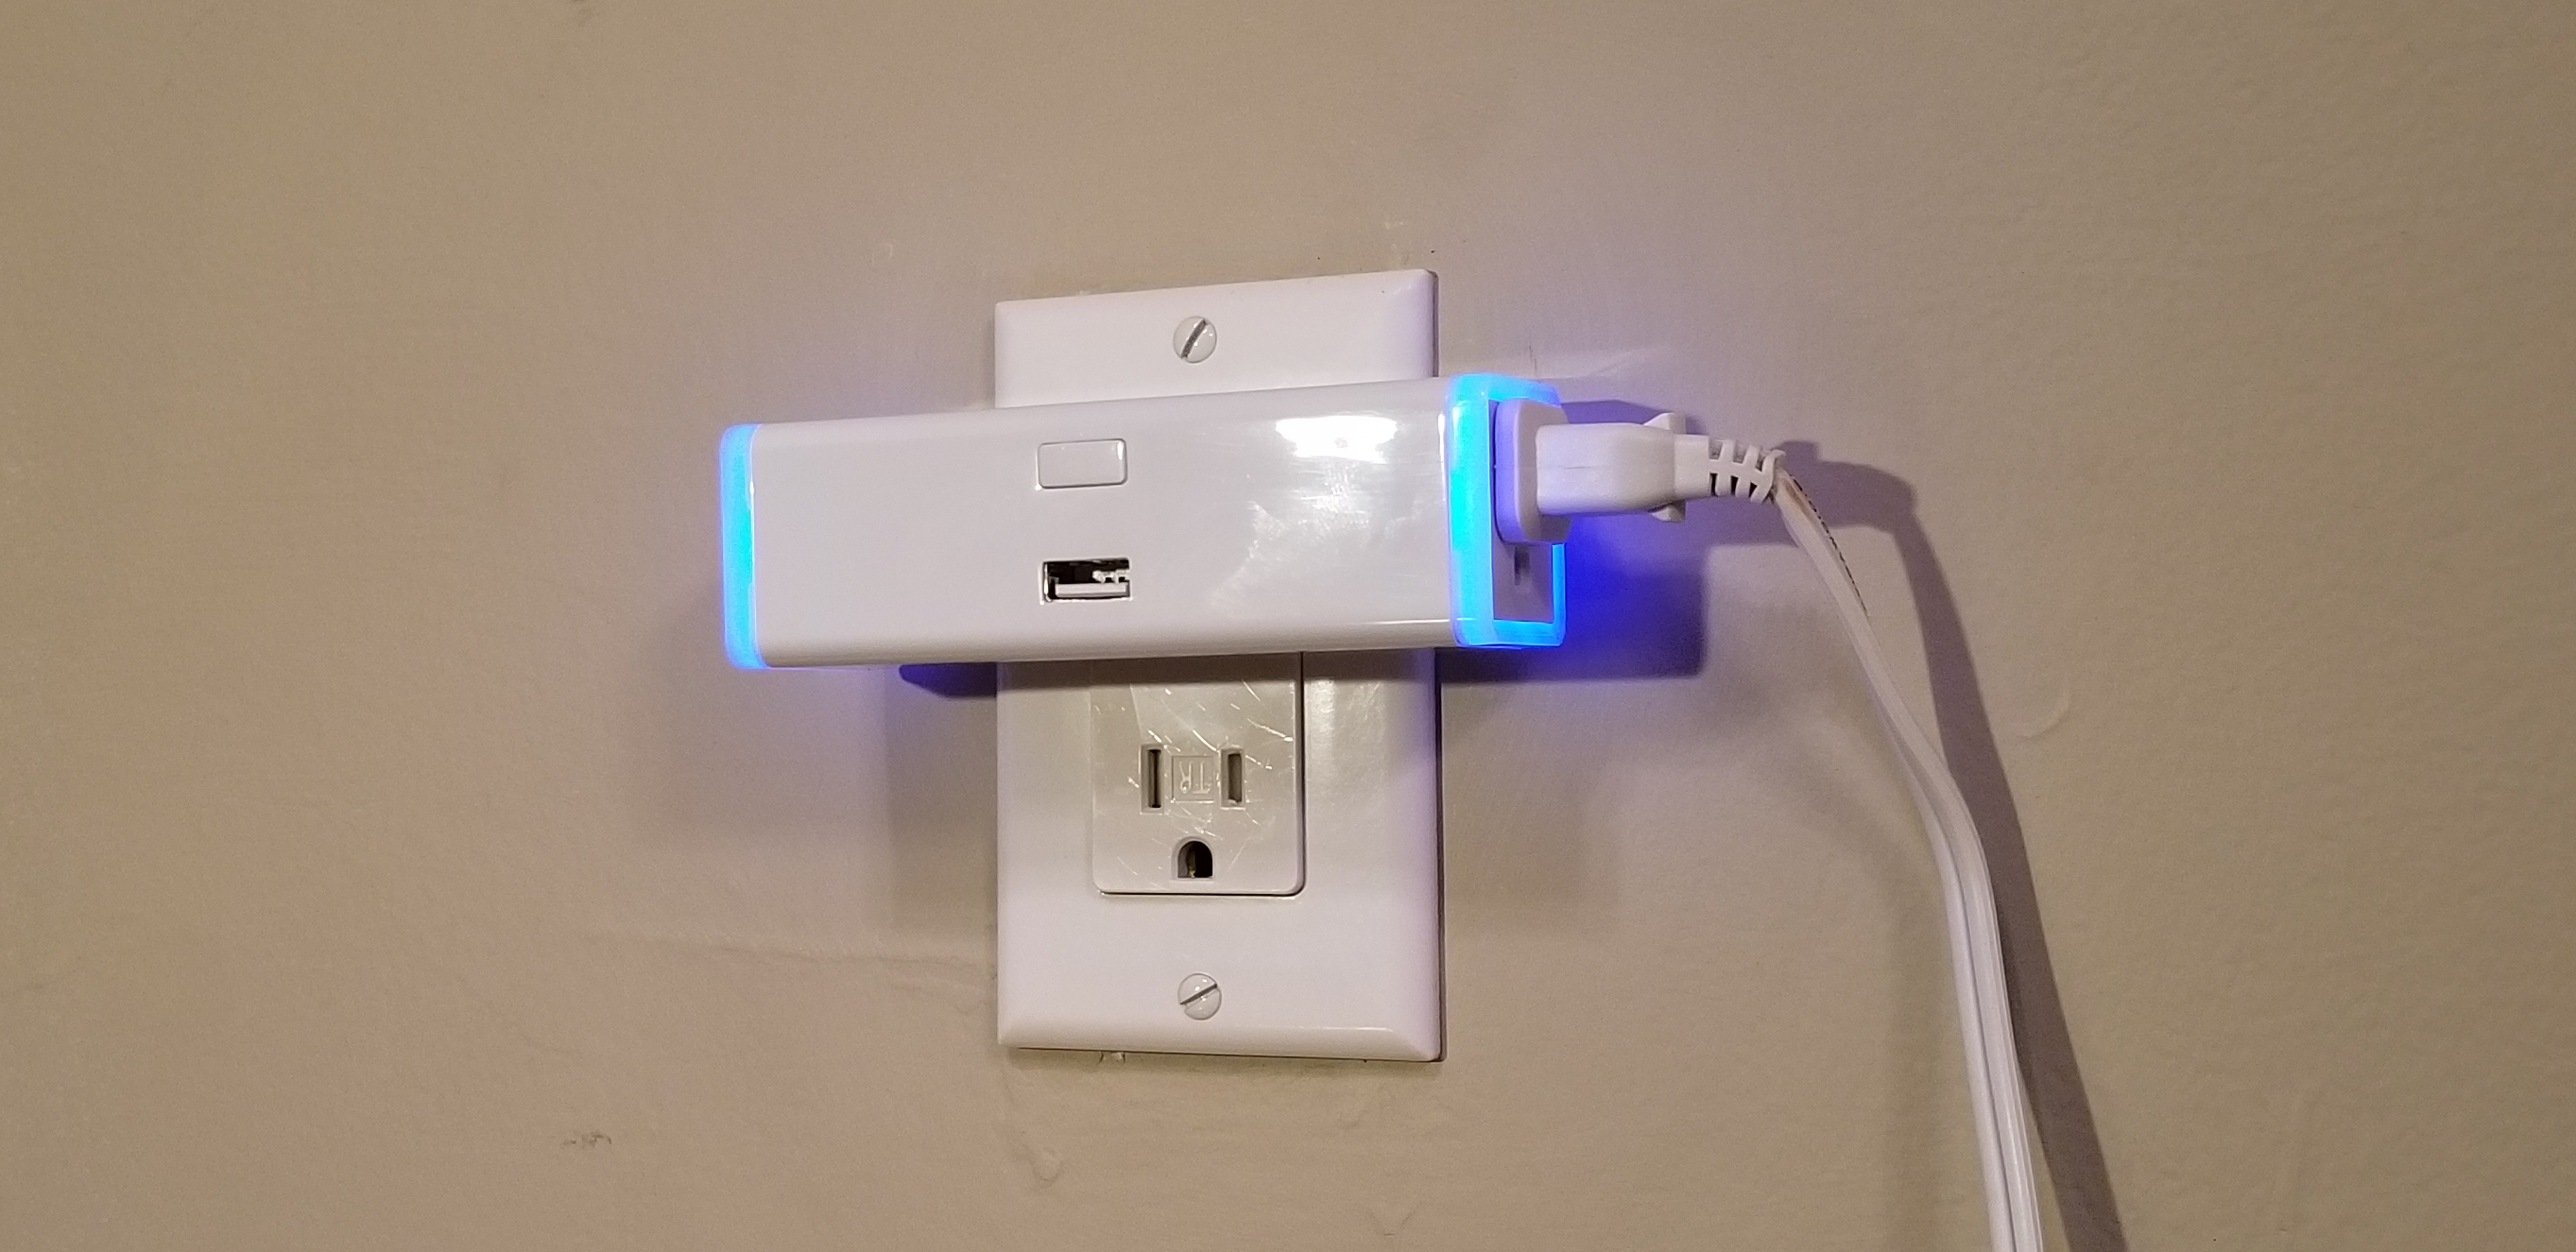
If you are in the search for a z-wave appliance plug, you may have noticed that most of them are big and clunky. They are hard to install in small places like behind furniture and typically only allow you to connect one plug. Zooz just introduced to the market not only a small form factor appliance plug but it also features a dual outlet module capable of outputting up to a combined 10 AMPS.

As a bonus, it also has a USB port capable of delivering 2.1 amps to power or charge your favorite devices. Note that the USB port is not controllable. To give you an idea of what 10 Amps are, we can use a 100 watt incandescent light bulb. At 120 volts, the typical current in the United States, a 100-watt light bulb draws 0.83 amps (100W/120V = .83 amps). In short, we would be able to power about 12 100Watt incandescent bulbs (9.999 amps) without any issue which is way more than any standard widget you may plug in there should use. If you do go over, the ZEN25 does have circuit protection that will disable both outlets.
Before we start we want to get out there that this appliance plug is not going to be good for fans and motors, Zooz recommends that you use ZEN15 for that. The appliance module is sold in a nice black box and packaged very well. Its packaging resembles that of opening a high-quality cellular telephone in some aspects. In the box, you will find the ZEN25 and the instruction manual. The manual is well written and easy to follow although it is almost not even necessary due to its ease of use. It does provide easy to read instructions for all its features.
The inclusion of the device to your z-wave network is among the easiest we have witnessed. Simply put your hub in inclusion mode and plug the double plug into the wall. The module will immediately begin to flash indicating it is in inclusion mode and go steady once it is connected.
We included our double switch with a Vera Controller and the process was seamless. The device showed up as four switches and instantly shows you the wattage of the device that is plugged into the module when that specific outlet is turned on. On your hub, you will see one switch for the left, one for the right, and another that provides simultaneous control over both outlets. The fourth just gives you status on the USB port but you are not able to turn it on or off.
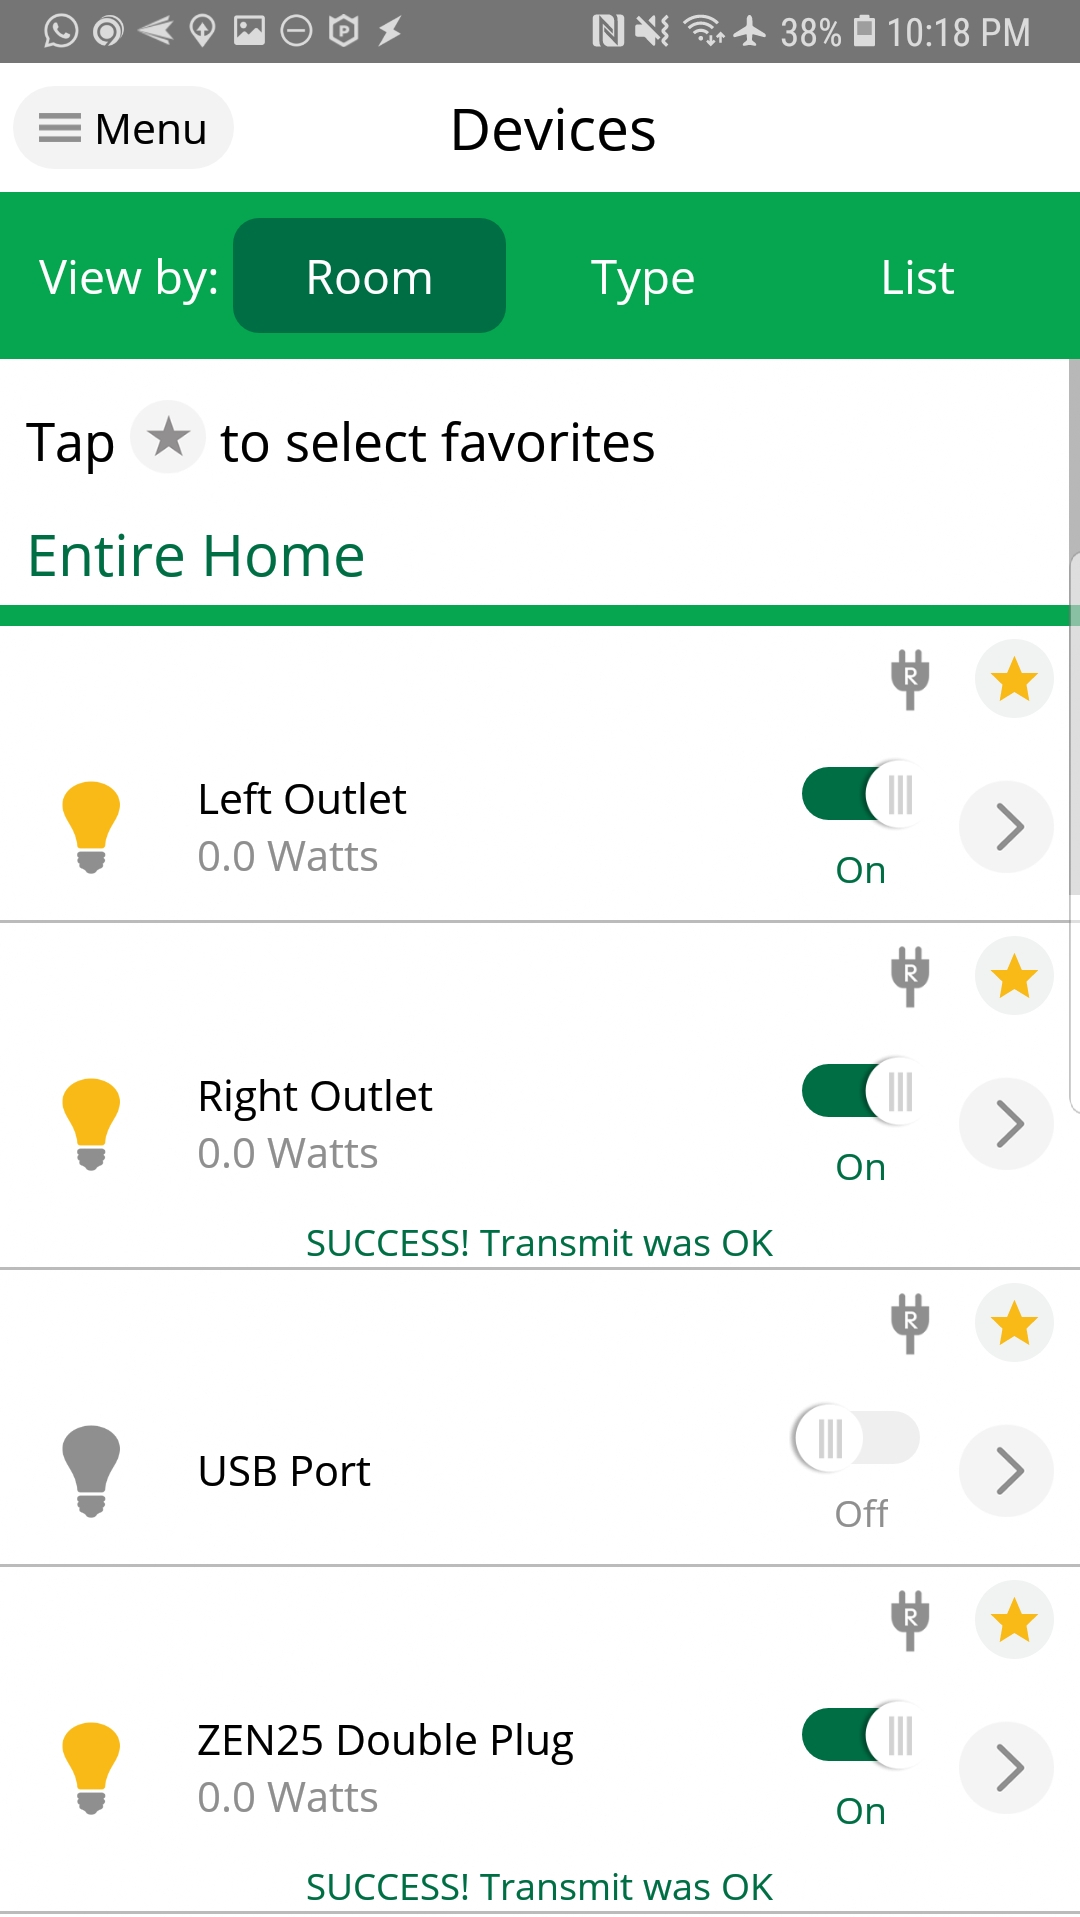
Manual control of the device is simple, there is only one button on the device. To control the on and off of the right switch you simply press the button once each time you want to toggle status. Press it quickly twice to control the left side.
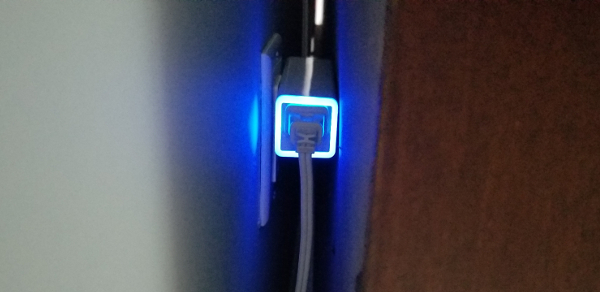
Zooz really outdid themselves with this one. The device is quick to respond and also acts as a repeater using the latest z-wave plus technology. The rings around the outlets not only turn on when the outlets are on but they also indicate the wattage being used by the individual port. Each of the 7 colors indicating a different wattage range and the ring will be off when not in use.
Finally, the double plug even includes a range test tool, we really liked this because at times it is hard to determine what range you have for certain devices and it is really easy to move this device around to perform a test without any special equipment. While the manual states that you simply press the button for 6 - 8 seconds consecutively to enable the range test, we noticed that all it did was enable and disable both outlet plugs simultaneously. We did, however, play with it long enough to figure out that pressing the button 3 times consecutively would enable the range test. After flashing for a few seconds in violet, it will indicate the overall signal strength using different color patterns on the rings around the outlets.
For the power users, you can also change your switch parameters via your hub to disable the LED rings around the outlets, set up an auto-on timer, or set up an auto-off timer.
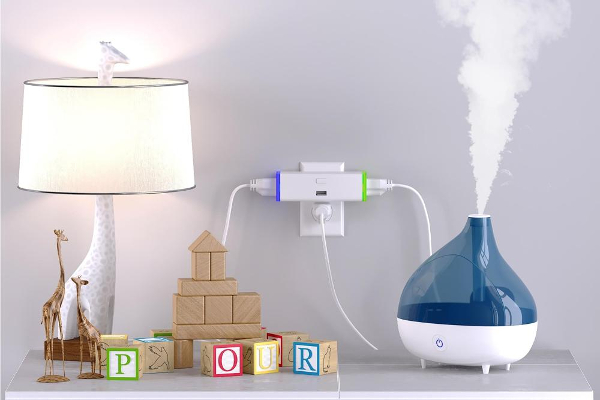
We really like the device and our favorite feature is that it is so small that it easily fits behind furniture. This device is perfect for kids rooms where you may want to control night lights and humidifiers or to control Christmas tree lights. Its features will make this a very versatile device capable of handling many scenarios. The device retails for $39.95 at The Smartest House. Click here to get your own now.
Take a look at our video review below.
As a bonus, it also has a USB port capable of delivering 2.1 amps to power or charge your favorite devices. Note that the USB port is not controllable. To give you an idea of what 10 Amps are, we can use a 100 watt incandescent light bulb. At 120 volts, the typical current in the United States, a 100-watt light bulb draws 0.83 amps (100W/120V = .83 amps). In short, we would be able to power about 12 100Watt incandescent bulbs (9.999 amps) without any issue which is way more than any standard widget you may plug in there should use. If you do go over, the ZEN25 does have circuit protection that will disable both outlets.
Before we start we want to get out there that this appliance plug is not going to be good for fans and motors, Zooz recommends that you use ZEN15 for that. The appliance module is sold in a nice black box and packaged very well. Its packaging resembles that of opening a high-quality cellular telephone in some aspects. In the box, you will find the ZEN25 and the instruction manual. The manual is well written and easy to follow although it is almost not even necessary due to its ease of use. It does provide easy to read instructions for all its features.
The inclusion of the device to your z-wave network is among the easiest we have witnessed. Simply put your hub in inclusion mode and plug the double plug into the wall. The module will immediately begin to flash indicating it is in inclusion mode and go steady once it is connected.
We included our double switch with a Vera Controller and the process was seamless. The device showed up as four switches and instantly shows you the wattage of the device that is plugged into the module when that specific outlet is turned on. On your hub, you will see one switch for the left, one for the right, and another that provides simultaneous control over both outlets. The fourth just gives you status on the USB port but you are not able to turn it on or off.
Manual control of the device is simple, there is only one button on the device. To control the on and off of the right switch you simply press the button once each time you want to toggle status. Press it quickly twice to control the left side.
Zooz really outdid themselves with this one. The device is quick to respond and also acts as a repeater using the latest z-wave plus technology. The rings around the outlets not only turn on when the outlets are on but they also indicate the wattage being used by the individual port. Each of the 7 colors indicating a different wattage range and the ring will be off when not in use.
Finally, the double plug even includes a range test tool, we really liked this because at times it is hard to determine what range you have for certain devices and it is really easy to move this device around to perform a test without any special equipment. While the manual states that you simply press the button for 6 - 8 seconds consecutively to enable the range test, we noticed that all it did was enable and disable both outlet plugs simultaneously. We did, however, play with it long enough to figure out that pressing the button 3 times consecutively would enable the range test. After flashing for a few seconds in violet, it will indicate the overall signal strength using different color patterns on the rings around the outlets.
For the power users, you can also change your switch parameters via your hub to disable the LED rings around the outlets, set up an auto-on timer, or set up an auto-off timer.
We really like the device and our favorite feature is that it is so small that it easily fits behind furniture. This device is perfect for kids rooms where you may want to control night lights and humidifiers or to control Christmas tree lights. Its features will make this a very versatile device capable of handling many scenarios. The device retails for $39.95 at The Smartest House. Click here to get your own now.
Take a look at our video review below.

Posted In: YouTube Video Review
Qubino Z-Wave Plus Flush RGBW Dimmer Review
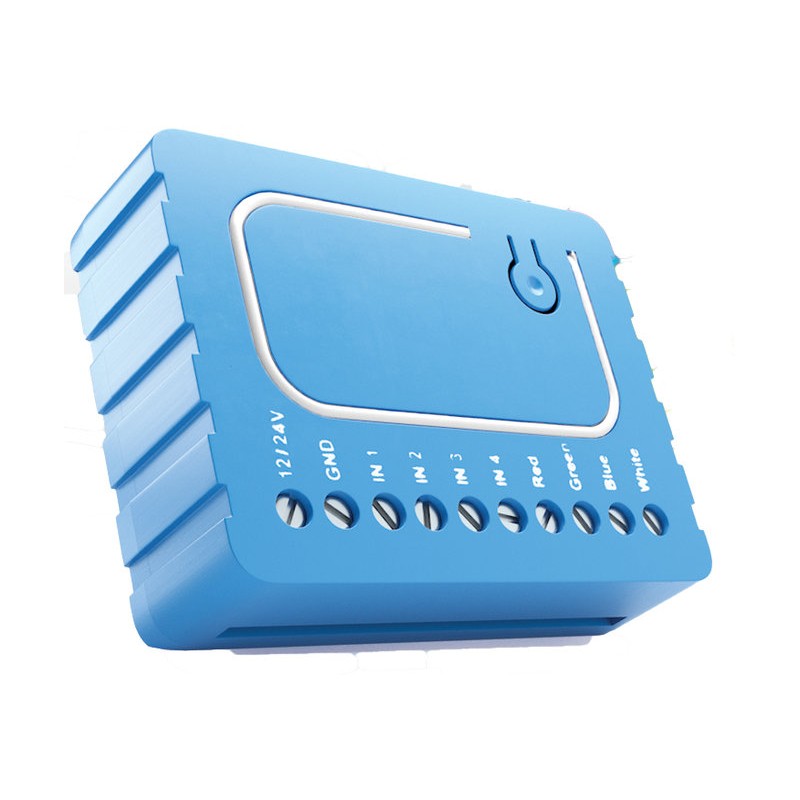
The Qubino Flush RGBW Dimmer is designed to control your RGB or RGBW LED strips in order to create countless color options. It includes 6 special lighting effects that can be used if your hub allows for enhanced parameters. The device works using z-wave technology and due to its small footprint can be installed virtually anywhere. A Z-Wave gateway hub will be required for your setup and is sold separately. If you haven't purchased a hub and you plan on using the Qubino flush RGBW make sure to read the hubs documentation as it is not supported by all hubs.
The switch is signal repeater, so it will improve your z wave mesh network. The Minimum and maximum dimming levels can be set via parameters. You can also customize the ramp rate, this allow you to change how quickly the lights turn on or off. Four push buttons allow for control of brightness, color, turning on or off lighting effects, and finally allow you to turn off the white output on its own. The dimmer switch saves and restores last status on power failure. Extra parameters allow you to put a timer in the event that you want to automatically turn the lights on or off after a set time. Note that this is just a timer and not a real time clock. If you would like to turn the device on our off at a specific time you can do so with a scene on your hub.
As of this review the Vera Hub does not support the device officially and the only plugin available is not very stable (Vera Firmware version tried: 1.7.3501 with the "RGB Controller" plugin Version:1.34). OpenHab also allows you to install the device however we were not able to operate it successfully even using the latest snapshot release (openHAB 2.3.0 Build #1189).
The installation of the device is extremely simple and can easily be done following the instructions on the Qubino page. Note this device will not work with 120 Volts AC but instead works with 12 or 24 Volts DC. You can control the flush RGBW either remotely through your Hubs graphical web interface, phone app, or through wall switches if wired directly to one.
Overall we were pleased with the product and the response with the smartthings hub. The device currently sells for $53.00. It is packaged in a tiny plastic shell that fits virtually anywhere. We weren't happy that it didn't work with Vera or OpenHab.
View the installation process and see it in action with a smart things hub in the full Video Review.
It is important to note that this device will only work with standard RGB strips and not addressable strips. In short this means that all your LED's will be one color at any given time. You will not be able to make the first five led's one color and the next five a different color.
Get your own Qubino Flush Relay at https://www.thesmartesthouse.com
Qubino RGBW Dimmer Info: http://qubino.com/products/flush-rgbw-dimmer/
RGBW Lights Used in review (Controller was not used): http://amzn.to/2sDNRbM
Smartthings Hub:http://amzn.to/2FcsbWI
Vera Hub: http://amzn.to/2CumDnH

Posted In: YouTube Video Review
Z-Wave.ME UZB USB Z-Wave Plus Stick Review
Looking for an inexpensive way to get started in home automation? Take a look at the UZB Z-Wave USB Stick.
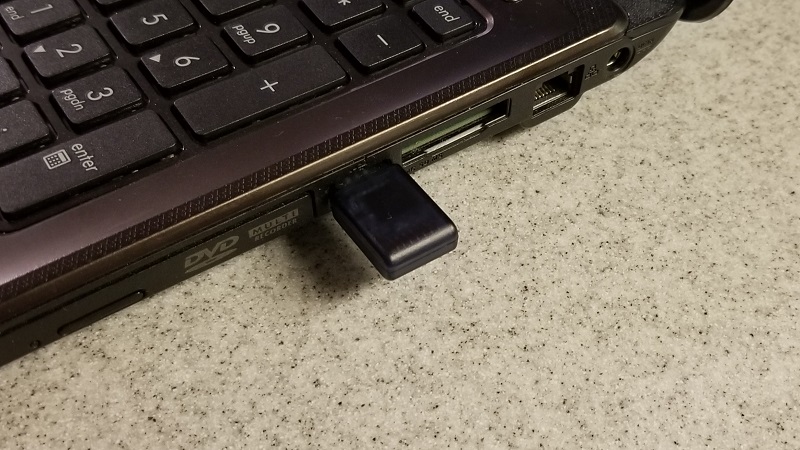
We gave the UZB stick a try and were pleased with it's performance. We installed it on a laptop and downloaded the openhab software that is available for free. The software can be downloaded from http://www.openhab.org. The UZB stick was found by the operating system immediately upon insertion. We are running Ubuntu Linux for our test so software drivers were not necessary. If you are running windows however you can find the link to the latest drivers on http://www.thesmartesthouse.com. We downloaded the openhab software and configured the UZB as indicated in the manual that was provided in the box. Once we configured the stick and restarted the software we were able to include 4 devices to test our UZB. We installed one GE relay switch, two Zooz Z-wave dimmers, and a Qubino Weather station. At first 3 of the devices were not recognized but it turned out to be the newer devices not having been implemented on the openhab stable release. Once we downloaded the snapshot build we were able to get the devices included. Communication to all 4 devices was a success.
We have tested the device thoroughly for about three weeks now and have not had any failures on communication. The closest device to the hub is about 15 feet away and the farthest is about 30 feet. The inherent nature of Z-wave uses each device as a mesh network to get the best route of communication back to the hub. Our hurdle throughout the test was actually getting to understand how the openhab software works and setting up the devices there. It is not a project for the faint at heart to understand and get openhab working. If you want something simpler, you may want to look into the other software titles mentioned below. Some of these titles offer different interfaces that may suit your need better. Our goal was to build a low cost system that would allow us to use and integrate as many devices into one hub as possible. The Openhab system is touted at being just that. While not the fault of the UZB device the openhab system has a steep learning curve but continues to improve and allow integration of more devices as it progresses to the future. The UZB device stood up to the test and functioned better than we expected.
Zwave.me states that the UZB firmware offers several extensions and enhancements over its competitors such as backup and recovery function including network topology, optimized transmitting queue handling to speed up transmitting process, firmware update from the OS level in the field, trusted platform module applying strong encryption, extended wakeup notification, and handling to extend battery life time of battery operated devices in the network. All these features and at a quarter of the price of competitors like the Aeon Labs Z Stick. The only feature we found missing was the self-contained inclusion that makes it simpler to include devices into your z-wave network. Other than that the UZB supports -Z-wave backup and restore that is a plus against the Aeon Labs unit.
One of the things we liked most about the UZB stick is that it is so versatile that you can run it on any hardware given the software is available. For instance you can build yourself the exact system we built on a laptop on an inexpensive raspberry Pi device that currently runs at about $35.00. The Raspberry Pi can be set up to be accessed via VNC so there is not even a need to have a designated monitor and keyboard for the device.
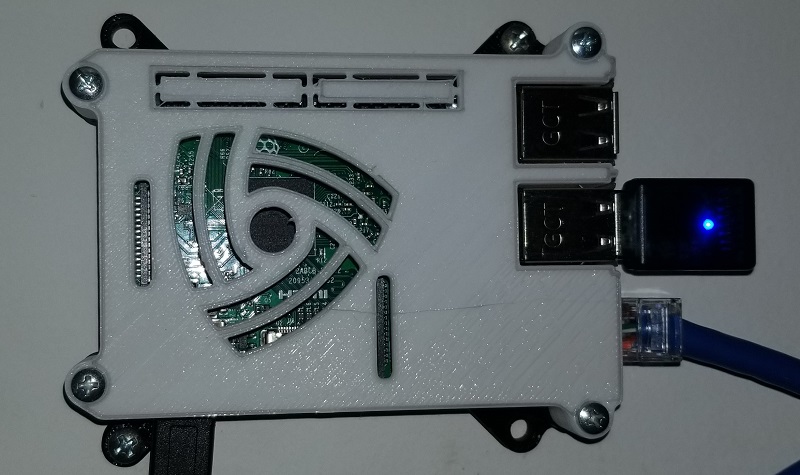
Here is the UZB attached to a Raspberry Pi mounted on the wall. The cover was 3D printed using a design by "0110-M-P" allowing for it to be wall mounted, you can find it here if interested.
While the UZB stick performed well and was easy to install, it was a bit challenging to use the open source software openhab2. The UZB uses the Sigma Serial API protocol just like the more expensive Aeon Labs Z-stick only at a fraction of the cost. The UZB by zwave.me proved to be a great little device at a great price.
Get your very own UZB Z-Wave Stick at The Smartest House.
Hardware compatibility with
-Wester Digital My Cloud NAS (Network Attached Storage)
-Raspberry Pi
-Windows / MAC / Linux
Software compatibility with
-Homeseer
-OpenHab
-OpenZWave
-Z-Way
-Indigo
-InControl
We gave the UZB stick a try and were pleased with it's performance. We installed it on a laptop and downloaded the openhab software that is available for free. The software can be downloaded from http://www.openhab.org. The UZB stick was found by the operating system immediately upon insertion. We are running Ubuntu Linux for our test so software drivers were not necessary. If you are running windows however you can find the link to the latest drivers on http://www.thesmartesthouse.com. We downloaded the openhab software and configured the UZB as indicated in the manual that was provided in the box. Once we configured the stick and restarted the software we were able to include 4 devices to test our UZB. We installed one GE relay switch, two Zooz Z-wave dimmers, and a Qubino Weather station. At first 3 of the devices were not recognized but it turned out to be the newer devices not having been implemented on the openhab stable release. Once we downloaded the snapshot build we were able to get the devices included. Communication to all 4 devices was a success.
We have tested the device thoroughly for about three weeks now and have not had any failures on communication. The closest device to the hub is about 15 feet away and the farthest is about 30 feet. The inherent nature of Z-wave uses each device as a mesh network to get the best route of communication back to the hub. Our hurdle throughout the test was actually getting to understand how the openhab software works and setting up the devices there. It is not a project for the faint at heart to understand and get openhab working. If you want something simpler, you may want to look into the other software titles mentioned below. Some of these titles offer different interfaces that may suit your need better. Our goal was to build a low cost system that would allow us to use and integrate as many devices into one hub as possible. The Openhab system is touted at being just that. While not the fault of the UZB device the openhab system has a steep learning curve but continues to improve and allow integration of more devices as it progresses to the future. The UZB device stood up to the test and functioned better than we expected.
Zwave.me states that the UZB firmware offers several extensions and enhancements over its competitors such as backup and recovery function including network topology, optimized transmitting queue handling to speed up transmitting process, firmware update from the OS level in the field, trusted platform module applying strong encryption, extended wakeup notification, and handling to extend battery life time of battery operated devices in the network. All these features and at a quarter of the price of competitors like the Aeon Labs Z Stick. The only feature we found missing was the self-contained inclusion that makes it simpler to include devices into your z-wave network. Other than that the UZB supports -Z-wave backup and restore that is a plus against the Aeon Labs unit.
One of the things we liked most about the UZB stick is that it is so versatile that you can run it on any hardware given the software is available. For instance you can build yourself the exact system we built on a laptop on an inexpensive raspberry Pi device that currently runs at about $35.00. The Raspberry Pi can be set up to be accessed via VNC so there is not even a need to have a designated monitor and keyboard for the device.
Here is the UZB attached to a Raspberry Pi mounted on the wall. The cover was 3D printed using a design by "0110-M-P" allowing for it to be wall mounted, you can find it here if interested.
While the UZB stick performed well and was easy to install, it was a bit challenging to use the open source software openhab2. The UZB uses the Sigma Serial API protocol just like the more expensive Aeon Labs Z-stick only at a fraction of the cost. The UZB by zwave.me proved to be a great little device at a great price.
Get your very own UZB Z-Wave Stick at The Smartest House.
Hardware compatibility with
-Wester Digital My Cloud NAS (Network Attached Storage)
-Raspberry Pi
-Windows / MAC / Linux
Software compatibility with
-Homeseer
-OpenHab
-OpenZWave
-Z-Way
-Indigo
-InControl

Posted In: Technology
Zooz Z-Wave Plus Dimmer Light Switch Review

The ZEN22 by Zooz can be used as a regular switch as well as used in a 3 way configuration. Like any other switch the Zooz dimmer switch allows you to turn on,off or change brightness levels on loads attached to it. Pairing it with your favorite hub the Zooz dimmer switch uses Z-Wave Plus technology which allows you to control and monitor your lights via your smart phone or computer. The convenience is unparalleled to just having a plain old switch. Just imagine brightening the lights to a dim hue in the hallway automatically when you get up to light your way in the middle of the night. Turning on lights as you open your front door so that you don’t come home to a dark house, or just dimming the lights to watch a romantic movie with the wife while never leaving the couch.
This switch is equipped with the newer Z-Wave Plus 500 series chip that allows for lower power consumption while also being more reliable than its predecessors. The Zen22 also acts as a repeater strengthening your Z-Wave mesh network making it and every z-wave device around it more reliable. The Zooz ZEN22 is built well and feels like a solid product. The switch features a blue LED that lights up at night allowing you to easily locate the switch when it is dark. The paddle on the switch also has the Zooz logo printed on it in a light gray.
The inclusion of the device to our Vera hub was fairly straightforward but note that it will work with any smart home hub so long as it speaks Z-Wave. Once your hub is in inclusion mode, you tap the upper half of the paddle three times quickly and the new dimmer will appear on your hub shortly after. The Switch features an air-gap switch for added safety in the event that you need to remove power from the switch temporarily.
This dimmer like most others, requires a neutral wire at the location of installation as this is used to keep the switch on while the load is off. If you do not have one , you will need to get a licensed electrician to install one. Your switch will require the Neutral, Load, Line and Ground when used in a regular installation, the traveler is introduced when used in a 3-way setup. The switch only comes with the installed color paddle in white so you wont be able to change the color if needed. When comparing it to different brands like the popular GE Smart Dimmer for instance, this is a good buy as the cost is usually lower and it offers the same functionality. There is also another advantage to the Zooz switches over its competitors in that it does not require a Z-Wave enabled slave switch, and can be used with a regular toggle switch. This means that you get to save all that extra cash and use the existing switch.
The one gotcha with this setup is that when you are using that toggle switch in a hallway for instance you will only be able to dim from the side that has the z-wave Zooz switch installed. Other manufacturers will have a slave switch that will allow the dimming feature but they wont be compatible with the Zooz. From the regular switch, you will only be able to turn the light on and off. When used in a 3-way configuration, the slave switch does not need to be a 3-way switch. You can use any regular switch you have lying around.
The manual is written well and is very easy to understand. It features large diagrams that are labeled well. Zooz also offers alternate diagrams for different setups on their website http://www.getzooz.com. Please note that if you are not comfortable with electricity or have any questions about your wiring , you should consult an electrician as three way setups can be tricky to master.
The switch works with LED, Compact fluorescent, and incandescent bulbs. If you are going to be using it with LED’s please note that Zooz states the device functions on loads of greater than 20 Watts which can be rather high for some LED bulbs. If your switch controls various LED bulbs in a hallway, this probably won’t be an issue but you may want to look into it. If the load is lower than 20 Watts it may work but will shorten the life of the switch.
We were surprised by the quality and build of the switch and impressed by its performance. The switches retail for $32.95 at the moment of this writing which is cheaper than most switches in the market today. The fact that you no longer need an add on switch sweetens the deal a bit more. It is important to note however that you wont be able to dim from the end with a regular switch.
Get your very own Zooz Z-Wave Dimmer Switch at www.thesmartesthouse.com
Manufacturer website: http://www.getzooz.com
Specifications
-Model Number: ZEN22 VER. 2.0
-Z-Wave Frequency: 908.42 MHz (US)
-Power: 120 VAC, 60 Hz
-Maximum Loads: 500W Single-gang, 400W Double-gang, -300W Triple-gang Incandescent, 150W CFL or LED
-Wireless Range: Up to 100 feet line of sight
-Operating Temperature: 32-104° F (0-40° C)
-Installation and Use: Indoor only

Posted In: YouTube Video Review
GoControl Z-Wave Dimmable LED Light Bulb Review
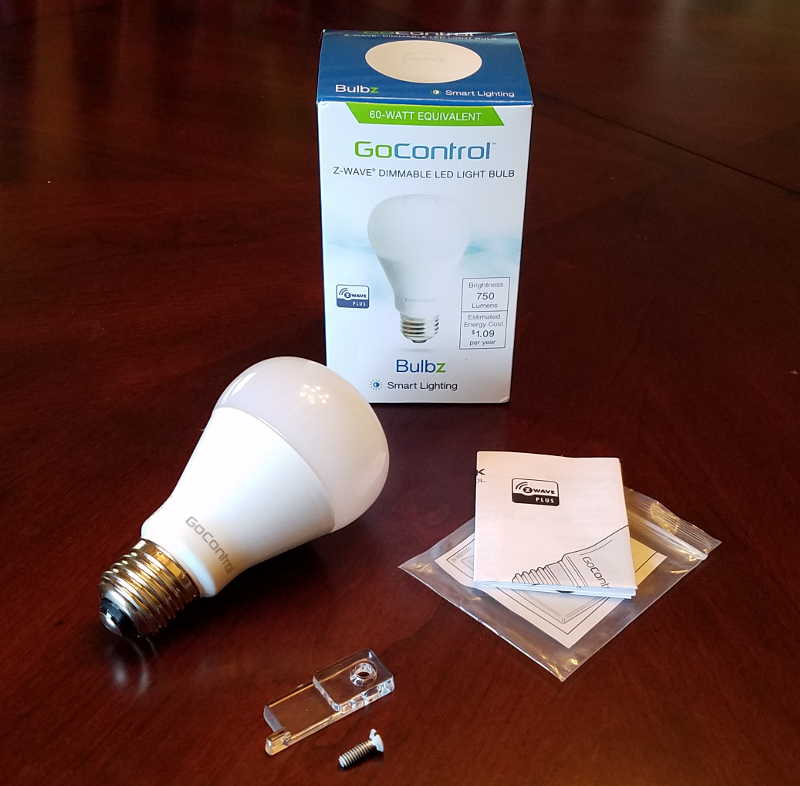
We gave the GoControl Z-Wave dimmable LED Light Bulb a try with out Vera Edge controller and were pleasantly pleased with the results. The Light bulb easily pairs with the controller by simply putting the controller on discovery mode and turning on the lamp. Upon initial power on, the device goes into discovery mode and once paired with the device, it flashes to let you know it is paired with your hub. The device is ready for use immediate after that. This is one of the easiest devices to pair we have come across. The 100% setting was definitely bright and can easily replace a 60 watt equivalent light bulb. The Go Control delivers a smooth 2700 kelvin rating soft white light that is easy on the eyes. Our initial application was to use this light bulb in a lamp for a children's bedrooms as a night light. Upon our initial installation we quickly noticed that this would not be a good application as a night light as its lowest level at 1% was still rather bright. Once we added the shade on the lamp, it helped out a tad bit but not enough to make us comfortable. That being said we also understand that a night light is not the purpose of this light bulb so we will not knock it for that, we just wish it would dim a tiny bit more. Overall the light bulb at its current price of 17.99 is more than ideal compared to its alternatives. The device should synch with any other z-wave controller such as the Smartthings hub, Zipato, Home seer, and Wink just to name a few. We tested the bulb for over a month and did have 3 instances where the bulb would turn on at full brightness over night which was deffinitley not desired specially as a night light. After replacing the bulb with another we have not had an issue. Overall if you are looking for a Z-Wave bulb you should deffinitley take a look at the GoControl Z-Wave Light Bulb as it is proced just right.
Get your GoControl Z-Wave Dimmable LED Light Bulb (LB60Z-1) on Amazon
Technical Specifications
- MPN: LB60Z-1
- UPC: 093863132995
- Base: Fits standard light socket (E27)
- Bulb Shape: A19
- Max. Illumination Output: 750 lumens
- Equivalent Incandescent Output: Equal to a 60 watt bulb
- Estimated Yearly Energy Cost: $1.09 (based on 3 hrs/day, 11¢Wh; cost depends on rates and use)
- Life: 25,000 hours / 22.8 years (based on 3 hrs/day)
- Color Temperature: 2700K
- Power Consumption: 9 Watts
- Dimming Levels: 1 to 100 Steps
- Input Voltage: 108 to 132 VAC
- Input Frequency: 57 to 62 Hz
- Operating Temperature: 0° to 40° C
- Z-Wave Chip: 500 Series
- Z-Wave Frequency: 908.42 MHz
- Wireless Range: Approximately 130 feet (line of sight)
- Z-Wave Repeater: Yes
- Network Inclusion: Standard & NWI
- OTA Firmware Updatable: Yes

Posted In: Technology
Qubino Z-Wave Plus Flush 1 Relay Review
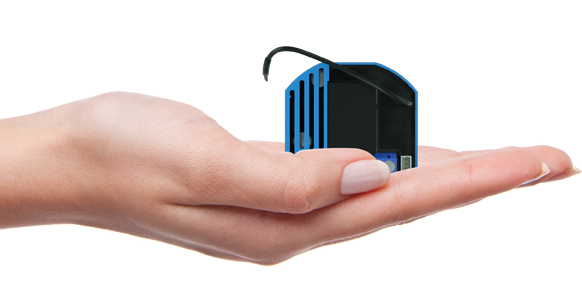
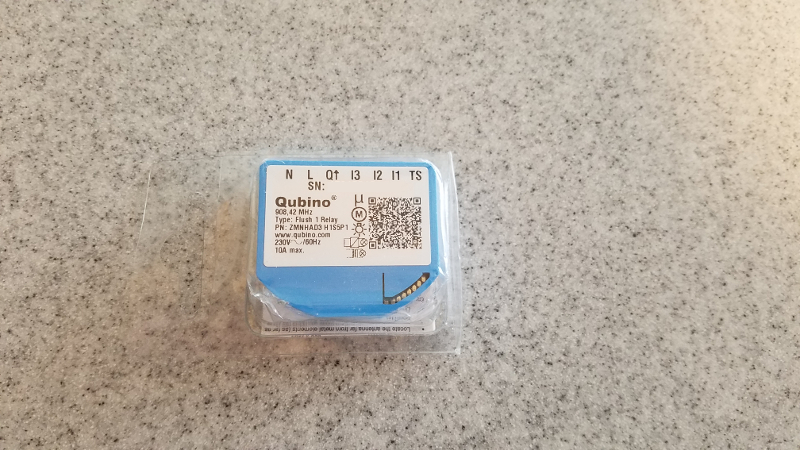
The Qubino Flush mount Relay module is a small device that fits inside a standard electrical outlet box and can be used to make a standard power outlet or switch, a smart device. At the time it is the world's smallest Flush Z-Wave Relay available which is rather important specially when you are dealing with limited space in your electrical boxes. The dimensions are 41.8 x 36.8 x 15.4 mm (WxHxD) or 1.65 x 1.45 x .6 inches and weighs only 28 g.
The nature of this device is that of a relay or an electrical device, typically incorporating an electromagnet, that is activated by a current or signal in one circuit to open or close another circuit. In layman's terms, it turns attached load devices on and off but cannot be used to dim devices. Qubino offers a dimming module that can do just that if it is the desired effect. You can control it either remotely through the Z-Wave network hub application, or through wall switches. A bonus is that it also measures power consumption of whatever is attached to the load side of the relay which can help the homeowner understand the energy consumption of light bulbs, or of any device that is attached.
The Qubino relay also supports the connection of a digital temperature sensor that can be purchased separately. The relay module is inherently a repeater so it will enhance your current mesh and improve the range and stability of each device in your Z-Wave network. It's power consumption is just 0.4 W which is among the lower spectrum of z-wave devices. The device also has some additional parameters that can be used by professionals as seen below. More details on these can be found here but note that we did not use any of these for our test.
Parameter no. 1 – Input I1 switch type
Parameter no. 2 & no. 3 – Input I2 & input I3 contact type
Parameter no. 11 - Automatic turning off output after set time
Parameter no. 12 - Automatic turning on output after set time
Parameter no. 15 - Automatic turning off / on seconds or milliseconds selection
Parameter no. 30 - Saving the state of the relay after a power failure
Parameter no. 40 – Power reporting in Watts on power change
Parameter no. 42 – Power reporting in Watts by time interval
Parameter no. 63 – Output Switch selection
Parameter no. 100 & no. 101 – Enable / Disable Endpoints I2 & I3 or select Notification Type
Parameter no. 110 – Temperature sensor offset settings
Parameter no. 120 – Digital temperature sensor reporting
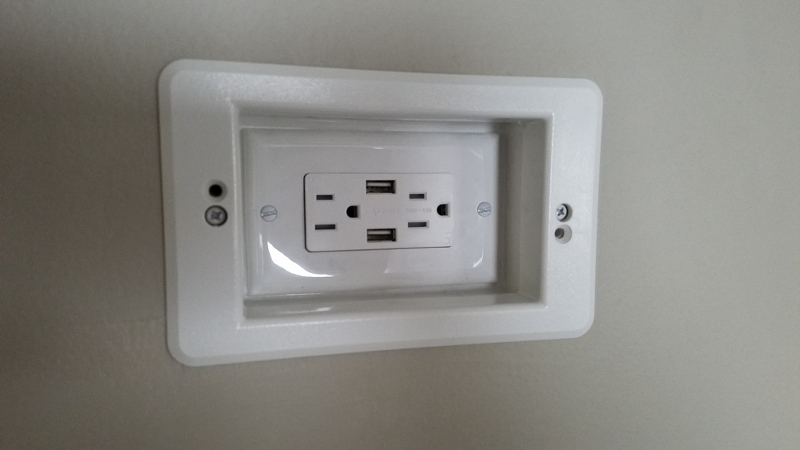
For our review we took on to installing the Qubino relay behind a recessed outlet that we can use to turn on and off an outlet at a specific time each day.
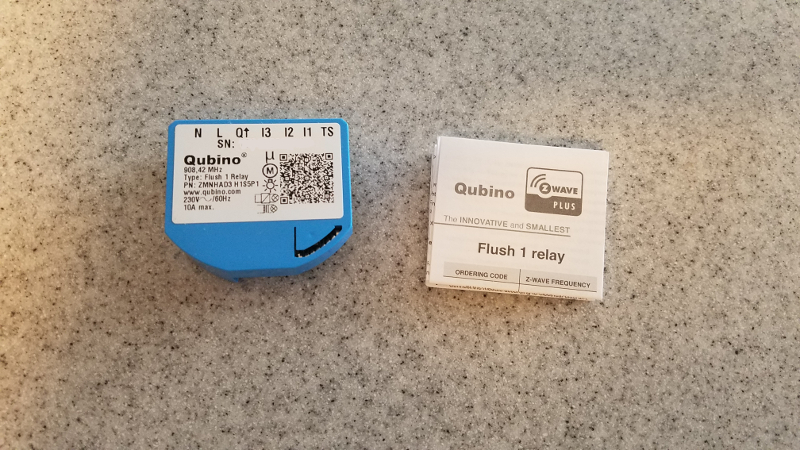
The Qubino Flush Relay came in simple packaging with just the unit and an instruction manual. The unit is very well built and feels like a quality product when handled.
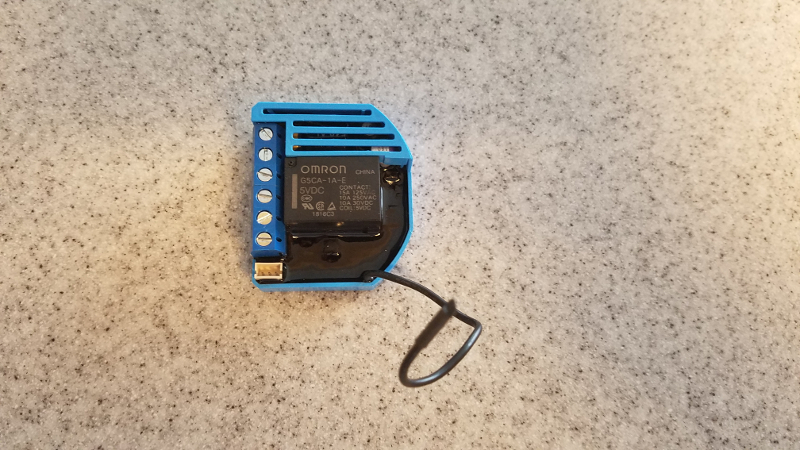
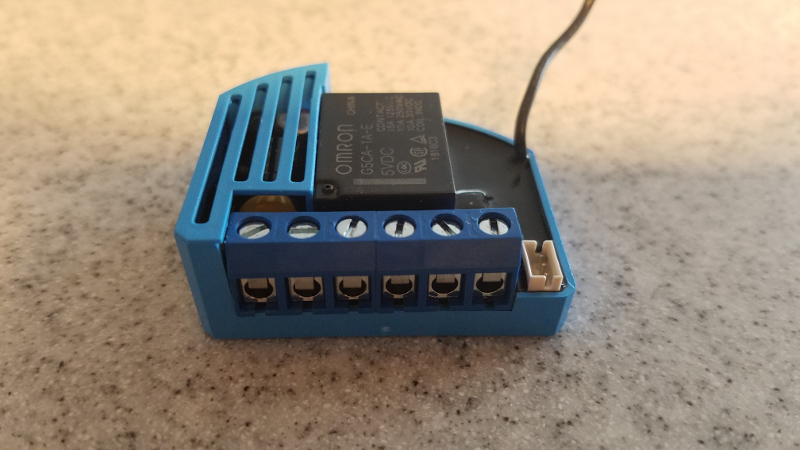
The terminals while small feel sturdy and are easy to screw down using a small precision screw driver. To turn our outlet on and off, we use a scene in our home automation hub while also allowing the same functionality from our smart homes graphical interface.
The installation was fairly simple and took just a few minutes. We first turned off the breaker to the outlet and from there went on to exposing the wires by removing the existing outlet. After doing this we identified the load (Ot), neutral (N) and line(L) wires. Our line and neutral wire was connected to the Qubino relay as identified in its labels on the first two slots. The screws were fairly easy to fasten but required a precision Philips screwdriver to make sure not to damage the head on the screw. The load wire was connected from the third slot and reattached to the outlet. once everything was connected, everything was put back in its place.
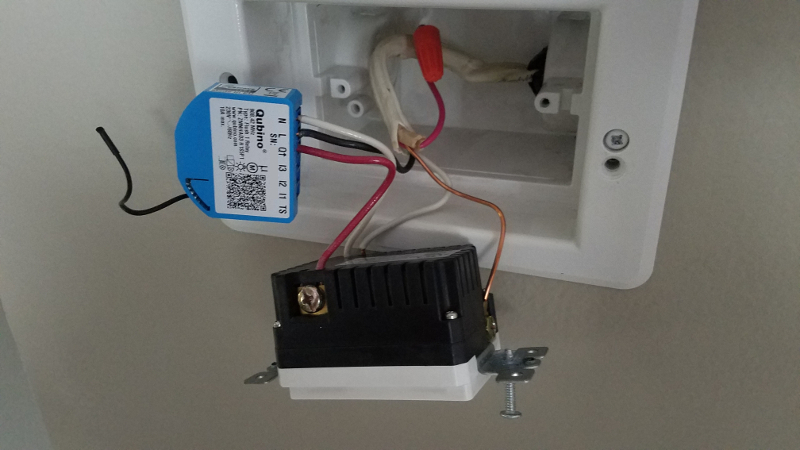
Here you see the qubino flush relay mounted behind our outlet ready for a faceplate. As can be seen the installation is clean and the unit does not occupy much room in the electrical box.

When first turned on the Qubino Flush Relay Module enables the inclusion mode for 5 seconds, in order to take advantage of the feature we started the inclusion mode on our Vera hub just prior to flipping the breaker. The Qubino was found and configured within 15 seconds. It was probably one of the quickest inclusions we have ever performed on our Vera Home Automation Hub. The device worked flawlessly and allowed for remote control of the outlet as expected. We simply love this little device mostly due to its size and functionality. The unit retails for 49.95 at various outlets like the The Smartest House or Amazon.
You can find more information on the Qubino Relay
Get your very own Qubino Z-Wave Plus Flush 1 Relay at www.thesmartesthouse.com
The nature of this device is that of a relay or an electrical device, typically incorporating an electromagnet, that is activated by a current or signal in one circuit to open or close another circuit. In layman's terms, it turns attached load devices on and off but cannot be used to dim devices. Qubino offers a dimming module that can do just that if it is the desired effect. You can control it either remotely through the Z-Wave network hub application, or through wall switches. A bonus is that it also measures power consumption of whatever is attached to the load side of the relay which can help the homeowner understand the energy consumption of light bulbs, or of any device that is attached.
The Qubino relay also supports the connection of a digital temperature sensor that can be purchased separately. The relay module is inherently a repeater so it will enhance your current mesh and improve the range and stability of each device in your Z-Wave network. It's power consumption is just 0.4 W which is among the lower spectrum of z-wave devices. The device also has some additional parameters that can be used by professionals as seen below. More details on these can be found here but note that we did not use any of these for our test.
Parameter no. 1 – Input I1 switch type
Parameter no. 2 & no. 3 – Input I2 & input I3 contact type
Parameter no. 11 - Automatic turning off output after set time
Parameter no. 12 - Automatic turning on output after set time
Parameter no. 15 - Automatic turning off / on seconds or milliseconds selection
Parameter no. 30 - Saving the state of the relay after a power failure
Parameter no. 40 – Power reporting in Watts on power change
Parameter no. 42 – Power reporting in Watts by time interval
Parameter no. 63 – Output Switch selection
Parameter no. 100 & no. 101 – Enable / Disable Endpoints I2 & I3 or select Notification Type
Parameter no. 110 – Temperature sensor offset settings
Parameter no. 120 – Digital temperature sensor reporting
For our review we took on to installing the Qubino relay behind a recessed outlet that we can use to turn on and off an outlet at a specific time each day.
The Qubino Flush Relay came in simple packaging with just the unit and an instruction manual. The unit is very well built and feels like a quality product when handled.
The terminals while small feel sturdy and are easy to screw down using a small precision screw driver. To turn our outlet on and off, we use a scene in our home automation hub while also allowing the same functionality from our smart homes graphical interface.
The installation was fairly simple and took just a few minutes. We first turned off the breaker to the outlet and from there went on to exposing the wires by removing the existing outlet. After doing this we identified the load (Ot), neutral (N) and line(L) wires. Our line and neutral wire was connected to the Qubino relay as identified in its labels on the first two slots. The screws were fairly easy to fasten but required a precision Philips screwdriver to make sure not to damage the head on the screw. The load wire was connected from the third slot and reattached to the outlet. once everything was connected, everything was put back in its place.
Here you see the qubino flush relay mounted behind our outlet ready for a faceplate. As can be seen the installation is clean and the unit does not occupy much room in the electrical box.
When first turned on the Qubino Flush Relay Module enables the inclusion mode for 5 seconds, in order to take advantage of the feature we started the inclusion mode on our Vera hub just prior to flipping the breaker. The Qubino was found and configured within 15 seconds. It was probably one of the quickest inclusions we have ever performed on our Vera Home Automation Hub. The device worked flawlessly and allowed for remote control of the outlet as expected. We simply love this little device mostly due to its size and functionality. The unit retails for 49.95 at various outlets like the The Smartest House or Amazon.
You can find more information on the Qubino Relay
Get your very own Qubino Z-Wave Plus Flush 1 Relay at www.thesmartesthouse.com

Posted In: Technology
Qubino Z-Wave Weather Station Review and Installation
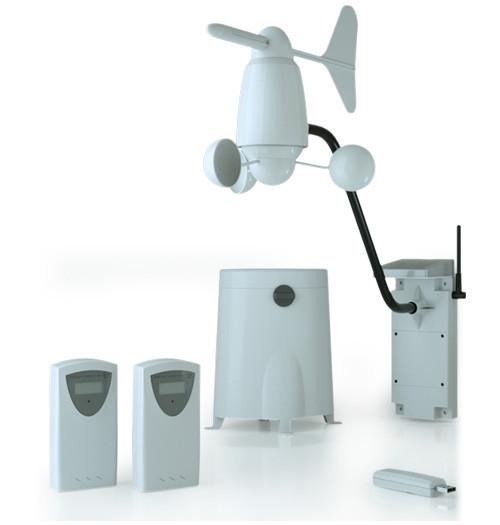
The Qubino Weather Station enables you to set up your z-wave hub in a way that will allow your smart devices to respond to climate events and changes. It has been the missing link that can help help you create all climate-related scenes in your smart home. The weather station kit includes a USB key, a user manual, and two thermo-hygrometers for the purpose of gathering temperature and humidity data. Also included is an anemometer which is just the fancy scientific name for a wind sensor as well as a separate rain sensor.
The sensors transmit all collected data to the Weather Station USB Key by wireless RF in different frequencies for different regions. The wireless radio frequency (RF) has a range of up to 100 meters in an open area while the z-wave range is up to 30m indoors (depending on building materials).
The USB Key just converts the telemetry it gathers from a wireless RF signal to your Z-wave network. The unit is capable of gathering the 10 measurements by default. It receives data for temperature, wind chill, velocity, wind gust, wind direction, humidity, rain rate and battery level for each Sensor. It is designed to act as repeater in order to improve range and stability of z-wave network as well. It is important to note that at the time of this review, the Qubino Weather station is only supported by HomeSeer, SmartThings Hub ( With a required custom device handler), Zipato Zipabox Smart Home Controller, and the Zipato ZipaTile Home Automation Controller. Our tests were all conducted with a Smarthings hub, if your hub is not mentioned, you may want to check with the manufacturer for support. Many manufacturers such as Vera will add support if enough users want the feature. The kit comes with pre-installed batteries, upon initial installation you must open all the units by removing the screws with a Philips head screwdriver and discarding the clear plastic tab that protects your unit from wasting batteries while in its packaging. You must do this on all sensors. Our YouTube video goes over much of the detail of the installation so make sure to watch it as things get a little tricky. The inclusion of this module to your z-wave network is a little cumbersome specifically on the smarthings hub but at least it does support which we can't say for the Vera for instance. Our weather station came from thesmartesthouse.com which offered a link to the Smart Things Hub custom device handler that is required for installation. Note that for standard devices such as light switches this step is not required so this differs from a standard z-wave device installation.
It is pretty neat that you can use the Qubino weather station to see weather data at home from anywhere in the world. The weather station can be used to trigger scenes that can close the shades and turn on the AC if its too hot outside. It can turn up the heat if its too cold. You can also set up scenes to disable your z-wave controlled sprinklers if it has rained recently. Overall we really enjoy the weather station and our only wish is that more hubs would support it. Take a look at our video for more details and a close up look at the working unit.
Get your very own Qubino Weather Station At www.thesmartesthouse.com
Correction: Our video states that the weather station is $200.00 but really retails for $239.95. They happened to have a sale the week the review was created.

Posted In: YouTube Video Review
RAD Garage Storage Heavy Duty Bike Hoist Lift Review
Chances are you are looking for some genius idea to get your bikes organized in your garage that won't break the bank. We too were on this challenging task and recently came across the RAD Garage Storage Heavy Duty Bike Hoist Lift.
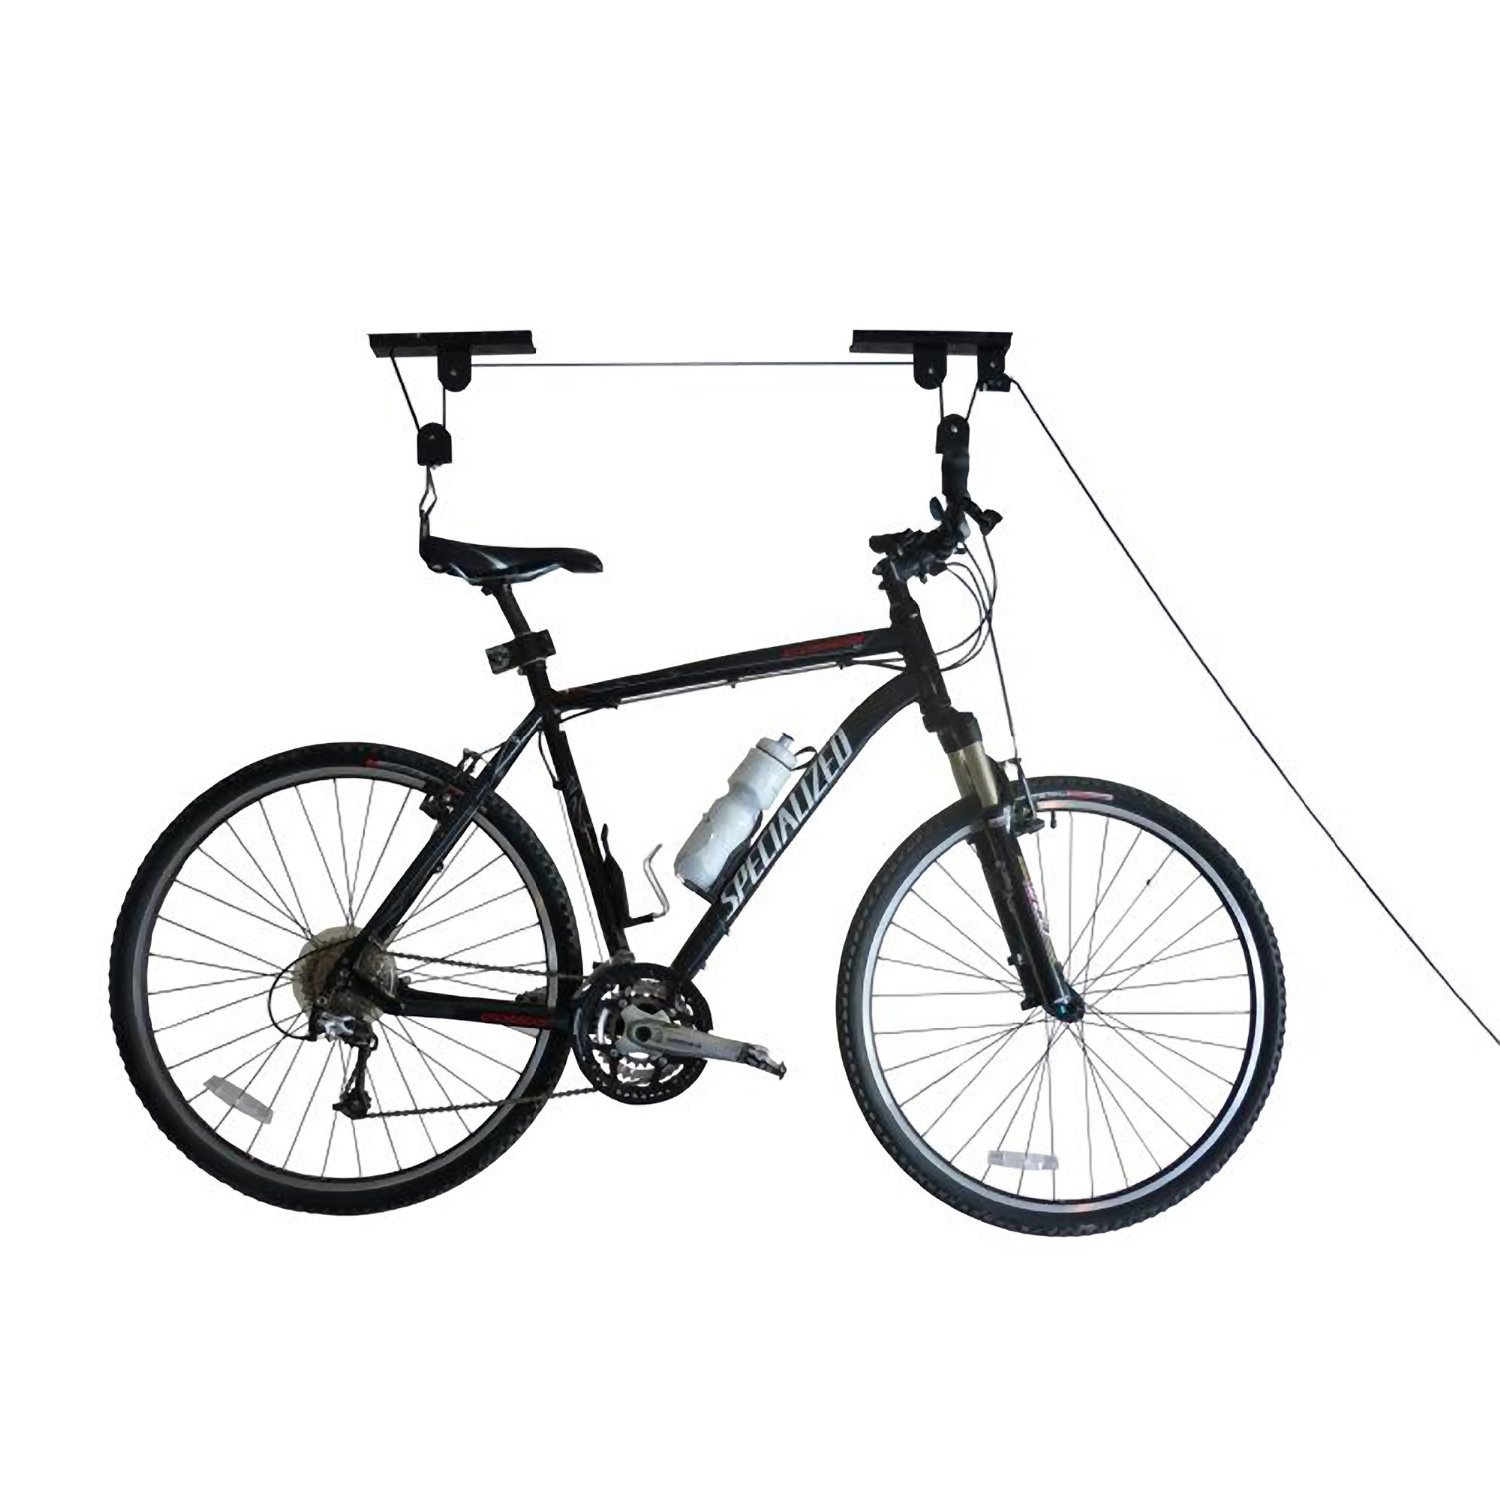
RAD Bicycle Hoist

We were pleased with the product and would recommend it. The RAD bicycle mount is going for about $14.00 on Amazon at the moment. Upon installation, the hoist delivered its promise of being able to hoist the bike with no issue. That being said, we made some minor modifications to allow us to use it in a more comfortable fashion.
First off, the installation manual is not the most friendly, it is one double sided sheet with a few images but not very clear instructions. Basically it tells you to attach to a hoist in your ceiling but doesn't really tell you how to find them.
We would recommend a stud finder which would add to the cost but if you have one then you are golden. The screws that come with the hoist are absolute garbage as they strip too easily. We wouldn’t use them to hold our bicycles and ended up using tapcon screws because we had a box of them laying around. The actual pulley system is pretty good considering the price and honestly you can't build one yourself any cheaper if you tried. It is a solid piece of metal and has a decent construction. The locking system is very basic but functional if installed correctly. The rope that comes with the system is made of braided vinyl, it is plenty long so you shouldn't have any issues there no matter how tall your ceilings are. In a while when the rope starts to deteriorate we will replace it with a nice Paracord Rope.
After installing the RAD hoist we started to lift up the first bike, and noticed that the hook that attaches to the rear seat was slipping off. We didn't feel too comfortable with it so we came up with this brilliant idea to use 18" Husky Hang-All Velcro Straps found at the Home Depot.
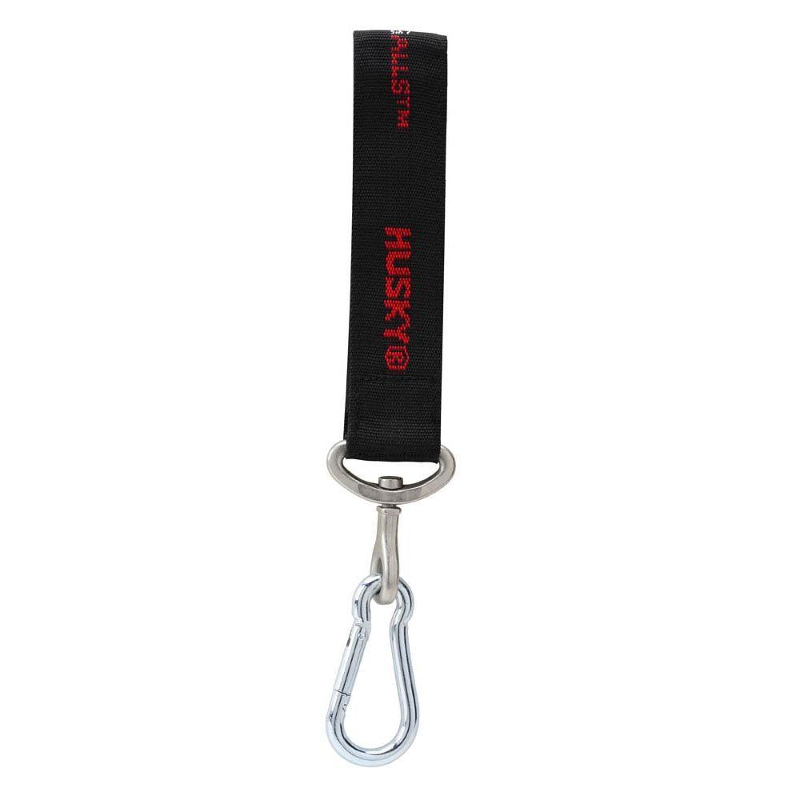
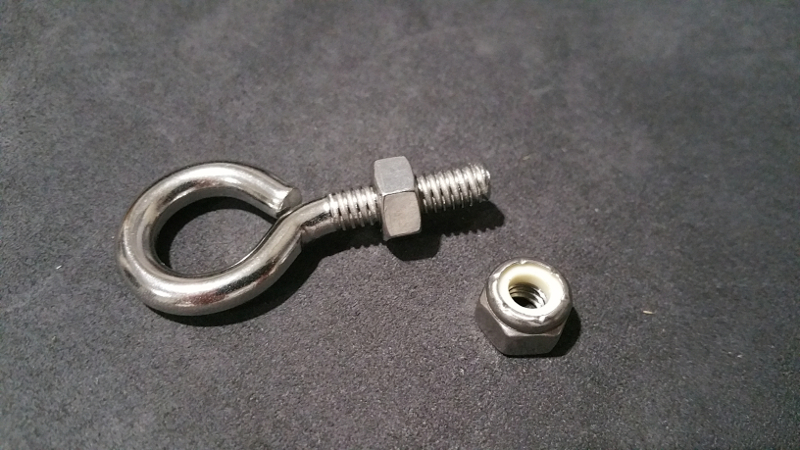
In order to complete our idea we removed the hooks from the RAD Hoist and replaced it with the 1/4" x 2" Stainless Eye Bolt and a nylon Nut to make it harder for it to come loose.
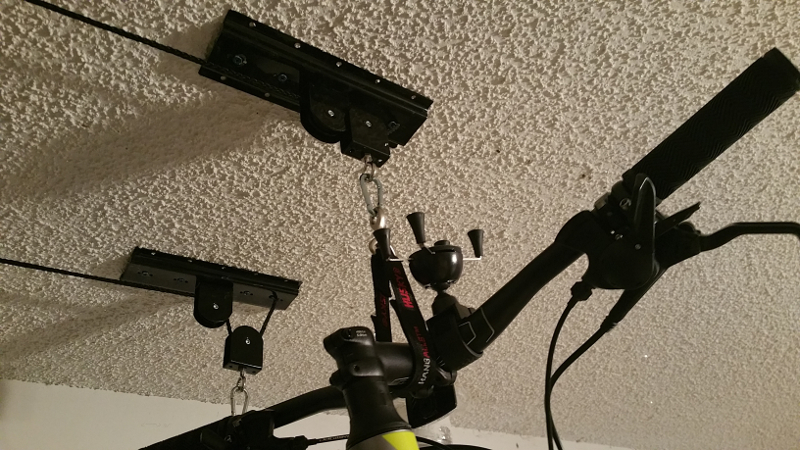
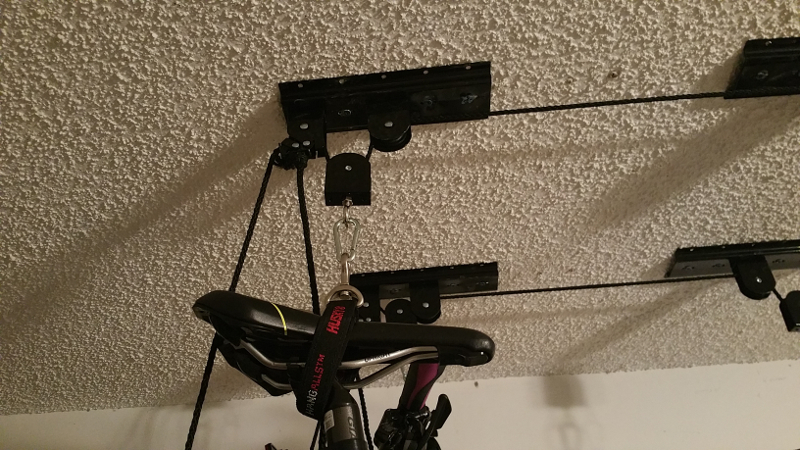
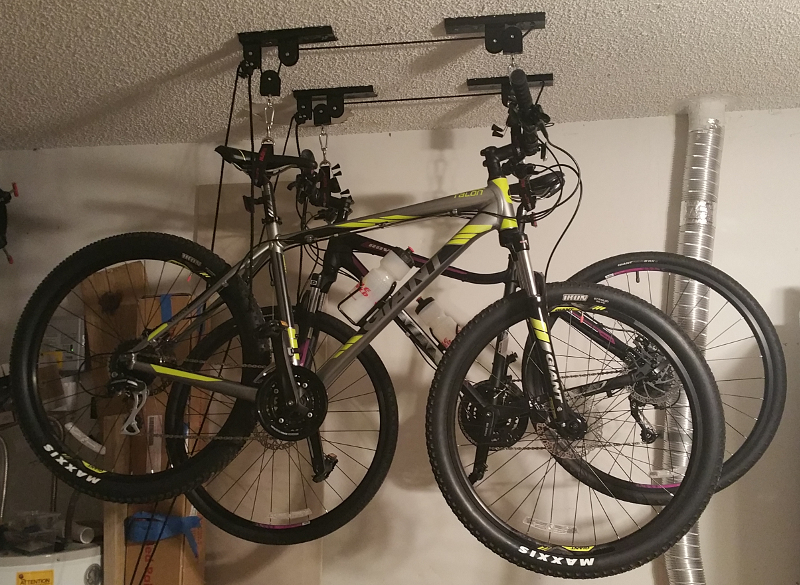
With these modifications, we feel this is the ultimate bike hoist and although its a little more expensive, it is worth the extra money. The modified hoist ended up costing about $25 dollars per bike. Here is the finished hoist with modifications and two hanging bikes. Note that these modifications are not necessary, and only provide for more convenience. Below are some images of the modified hoist.
The Good
- Cheap bike hoist system
- Helps clean the clutter
The Bad
- Screws should be stronger
- Hook system is hard to use on bikes that don't have a cupped seat that the hook can grab on to
- Subpar instructions
Get your own RAD Bicicle hoist on Amazon.
RAD Bicycle Hoist
We were pleased with the product and would recommend it. The RAD bicycle mount is going for about $14.00 on Amazon at the moment. Upon installation, the hoist delivered its promise of being able to hoist the bike with no issue. That being said, we made some minor modifications to allow us to use it in a more comfortable fashion.
First off, the installation manual is not the most friendly, it is one double sided sheet with a few images but not very clear instructions. Basically it tells you to attach to a hoist in your ceiling but doesn't really tell you how to find them.
We would recommend a stud finder which would add to the cost but if you have one then you are golden. The screws that come with the hoist are absolute garbage as they strip too easily. We wouldn’t use them to hold our bicycles and ended up using tapcon screws because we had a box of them laying around. The actual pulley system is pretty good considering the price and honestly you can't build one yourself any cheaper if you tried. It is a solid piece of metal and has a decent construction. The locking system is very basic but functional if installed correctly. The rope that comes with the system is made of braided vinyl, it is plenty long so you shouldn't have any issues there no matter how tall your ceilings are. In a while when the rope starts to deteriorate we will replace it with a nice Paracord Rope.
After installing the RAD hoist we started to lift up the first bike, and noticed that the hook that attaches to the rear seat was slipping off. We didn't feel too comfortable with it so we came up with this brilliant idea to use 18" Husky Hang-All Velcro Straps found at the Home Depot.
In order to complete our idea we removed the hooks from the RAD Hoist and replaced it with the 1/4" x 2" Stainless Eye Bolt and a nylon Nut to make it harder for it to come loose.
With these modifications, we feel this is the ultimate bike hoist and although its a little more expensive, it is worth the extra money. The modified hoist ended up costing about $25 dollars per bike. Here is the finished hoist with modifications and two hanging bikes. Note that these modifications are not necessary, and only provide for more convenience. Below are some images of the modified hoist.
The Good
- Cheap bike hoist system
- Helps clean the clutter
The Bad
- Screws should be stronger
- Hook system is hard to use on bikes that don't have a cupped seat that the hook can grab on to
- Subpar instructions
Get your own RAD Bicicle hoist on Amazon.

Posted In: Tools
keep up to date:
choose a category:
- Accessories and Decor
- Art
- Books
- DIY
- Editorials
- Furniture
- Garden and Patio
- Gifts for Men
- Gifts for Women
- Go Green
- Health
- Home Automation
- Kitchen and Baths
- Lighting
- Miscellaneous
- Parenting
- Pets
- Reviews
- Site News
- Software
- Sponsor Thanks
- Technology
- Tools
- Toys and Games
- Walls and Floors
- YouTube Video Review

friends and links